Click here to download the pattern file from google docs.
Material: Made for knits, 25% minimum stretch. Photographed item is from a cotton interlock.
Sizing: Size 40 european approximately, M/L, bust approximately 36" at full bust
Seam allowances: SA are noted on the pattern at 1/2". The sewing lines are also noted in case you prefer to cut off the SA or change them.
Yardage requirements: Approximately 1-1/2 yds of 60" wide
Other supplies:
1. One 23-24" piece of coordinating or contrasting trim for lower front. I used cotton trim in the sample. If using nonstretch trim, preshrink. I used 1 inch width.
2. One 6-8" piece stretch lace for the keyhole neck opening.
Instructions:
1. Cut out front and back on fold, sleeve x2. In addition you need to cut approximately 52" of 1" self binding for the neckline plus tie extensions.

2. Turn up 1/2 inch hem allowance on the shirt front piece but do not sew yet.

3. Measure your front bottom trim and place right side of trim to wrong side of shirt front, leaving trim extending below front piece. If you are using 1" trim, you can align the raw edges together and it will come out right (i.e., back piece is 1/2" longer than front). If using wider or narrower, you will need to adjust it so that the front and back will meet (see #11 below).

4. Stitch front hem and trim on in one pass, using double needle or coverstitch.
5. Hem back piece and sleeve bottoms with 1" hem, using coverstitch or double needle, to match front hem.

6. Pin stretch trim to keyhole neckline area, stretching it to fit.

7. Sew the lace neckline trim on, sewing close to the inner edge of the trim piece.


8. Cut off excess neckline fabric behind the lace trim, such that the lace trim has no fabric behind it, being careful not to cut through the lace.
9. Sew front of shirt to back of shirt at shoulders, right sides together. Topstitch if desired.
10. Sew each sleeve to respective side of the body of shirt, right sides together. Topstitch if desired.

11. Sew sleeve seam, underarm and side seams in one continuous stitch line. Be sure to catch the edge of the lace trim at the front bottom into the stitching.

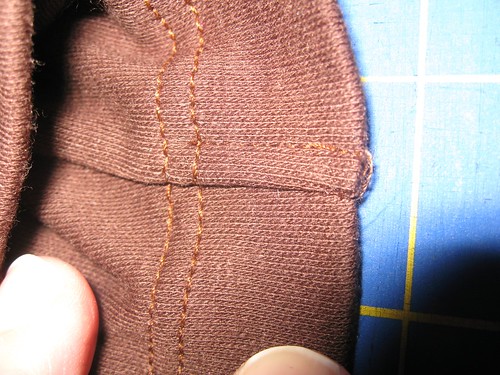
12. Fold the seam allowances at bottom hem and sleeve hem towards the back and tack down with a small stitch line parallel to the seam (see photos). This is for comfort and appearance.

13. Pin the 1" self-binding to the neckline, placing midpoint of the binding at center back. Stitch in place, right side of binding to right side of neckline.

14. Press the binding upwards, away from the top. Fold in the raw edge of the binding towards the center and press.

15. Fold the binding to the back. Then topstitch on the front, securing the binding. Sew all the way down the ties, tucking in the raw edges at the end of the ties to give a finished look at the end of the ties.

All Done!

