Wednesday, November 11, 2009

How to make the top I made - I will (hopefully, never tried before!)  be uploading a .pdf file for the pattern, approximately size M/L in US sizing, or about 38/40 in european.  You can see how fits me; I like them a bit loose and the top shown is with a very stable interlock, not much stretch.  If you make it please let me know!  I would love to see how yours turns out and whether you like it or not. 

Click here to download the pattern file from google docs. 


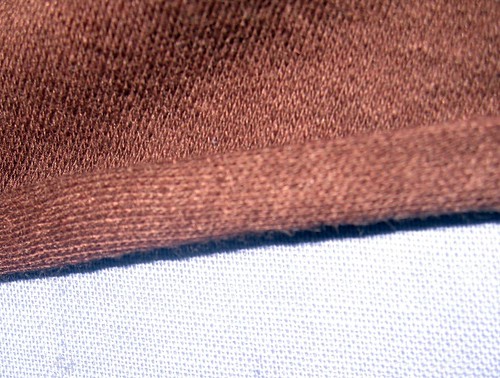
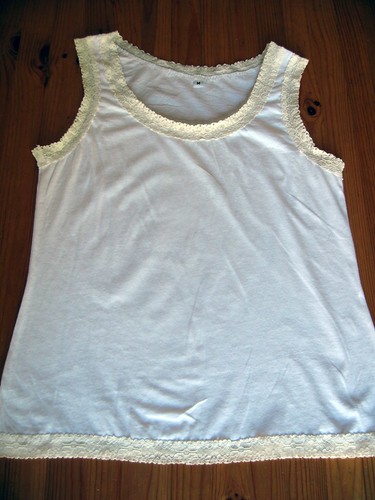
Material: Made for knits, 25% minimum stretch. Photographed item is from a cotton interlock.

Sizing: Size 40 european approximately, M/L, bust approximately 36" at full bust

Seam allowances: SA are noted on the pattern at 1/2". The sewing lines are also noted in case you prefer to cut off the SA or change them.

Yardage requirements: Approximately 1-1/2 yds of 60" wide

Other supplies:
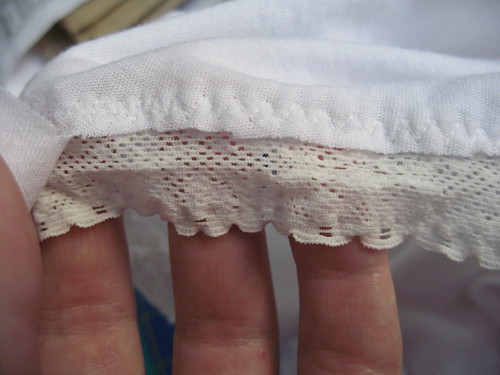
1. One 23-24" piece of coordinating or contrasting trim for lower front. I used cotton trim in the sample. If using nonstretch trim, preshrink. I used 1 inch width.
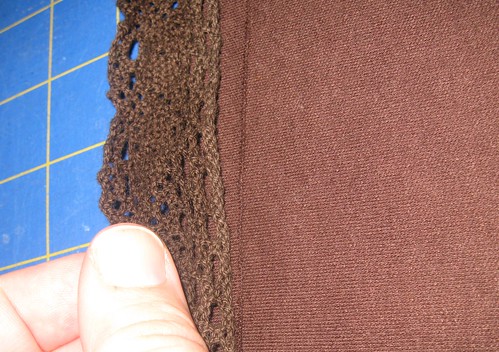
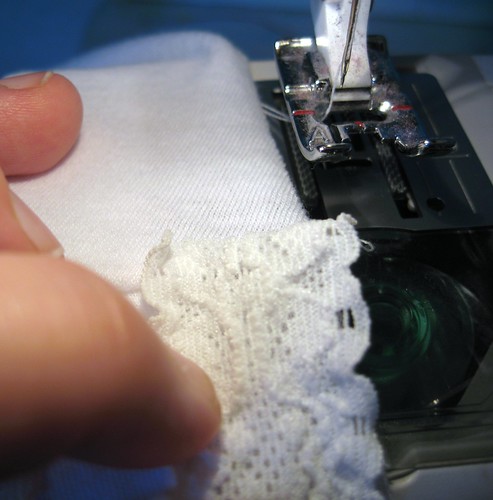
2. One 6-8" piece stretch lace for the keyhole neck opening.

Instructions:
1. Cut out front and back on fold, sleeve x2. In addition you need to cut approximately 52" of 1" self binding for the neckline plus tie extensions.


2. Turn up 1/2 inch hem allowance on the shirt front piece but do not sew yet.


3. Measure your front bottom trim and place right side of trim to wrong side of shirt front, leaving trim extending below front piece. If you are using 1" trim, you can align the raw edges together and it will come out right (i.e., back piece is 1/2" longer than front). If using wider or narrower, you will need to adjust it so that the front and back will meet (see #11 below).


4. Stitch front hem and trim on in one pass, using double needle or coverstitch.

5. Hem back piece and sleeve bottoms with 1" hem, using coverstitch or double needle, to match front hem.


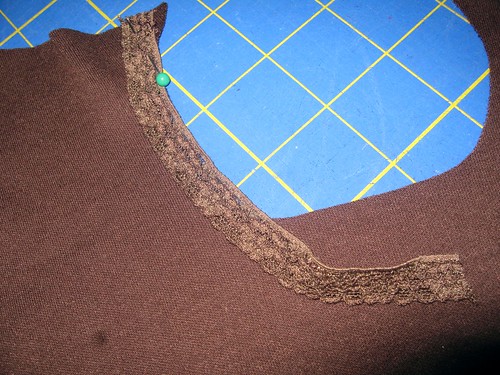
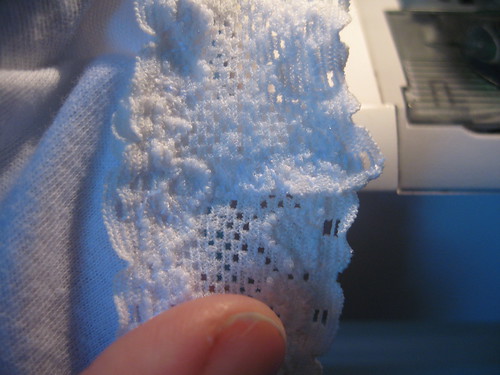
6. Pin stretch trim to keyhole neckline area, stretching it to fit.


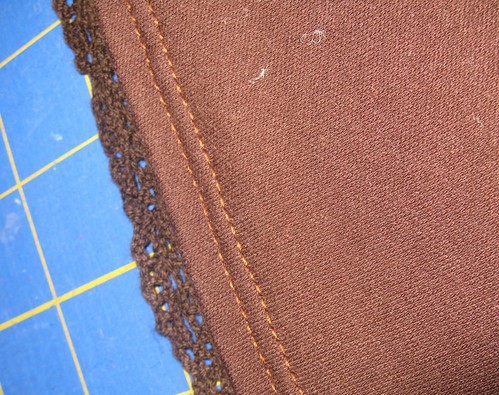
7. Sew the lace neckline trim on, sewing close to the inner edge of the trim piece.


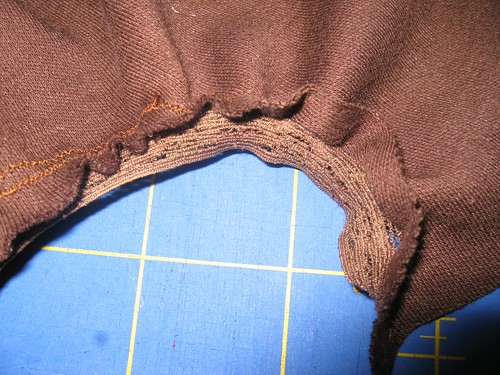
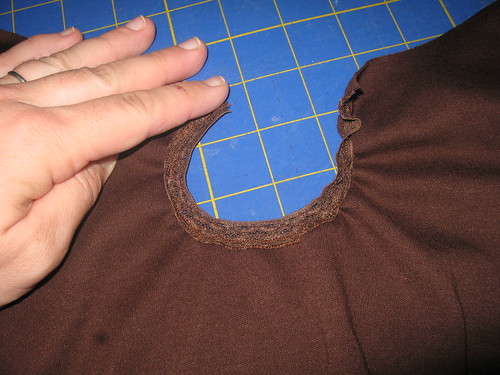
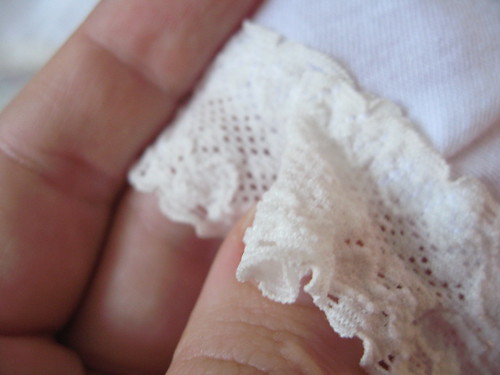
8. Cut off excess neckline fabric behind the lace trim, such that the lace trim has no fabric behind it, being careful not to cut through the lace.

9. Sew front of shirt to back of shirt at shoulders, right sides together. Topstitch if desired.

10. Sew each sleeve to respective side of the body of shirt, right sides together. Topstitch if desired.


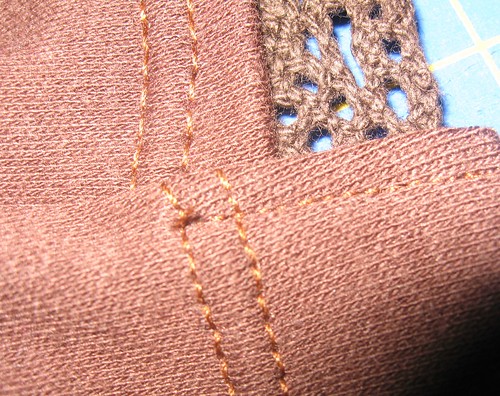
11. Sew sleeve seam, underarm and side seams in one continuous stitch line. Be sure to catch the edge of the lace trim at the front bottom into the stitching.


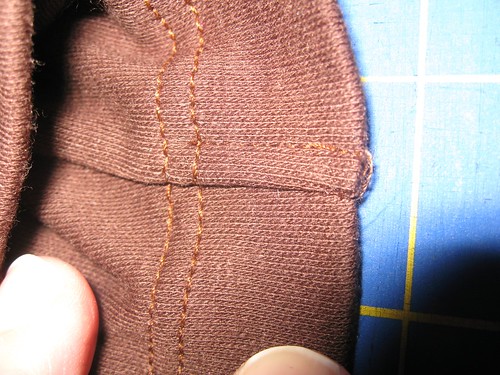
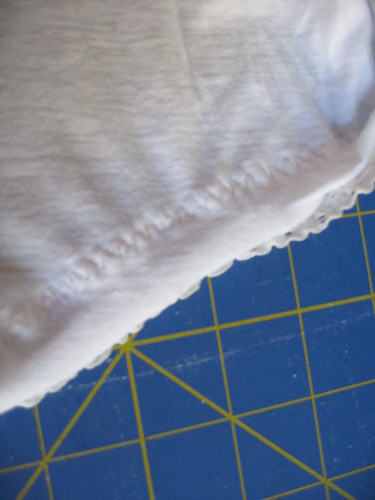
12. Fold the seam allowances at bottom hem and sleeve hem towards the back and tack down with a small stitch line parallel to the seam (see photos). This is for comfort and appearance.


13. Pin the 1" self-binding to the neckline, placing midpoint of the binding at center back. Stitch in place, right side of binding to right side of neckline.


14. Press the binding upwards, away from the top. Fold in the raw edge of the binding towards the center and press.


15. Fold the binding to the back. Then topstitch on the front, securing the binding. Sew all the way down the ties, tucking in the raw edges at the end of the ties to give a finished look at the end of the ties.


All Done! Edit/Delete Message

Thursday, October 15, 2009

No pattern!


IMG_5132
Originally uploaded by WeeBeaks

Okay, I know some of you whip up things without patterns all the time, but it is out of my personal comfort zone. But I did it. I made this top with no pattern. I cheated a bit though, okay a lot, in that I had a top I loved that developed a large grease stain on the front. It was totally unwearable! I set it aside (after trying multiple times to get out the stain). Finally today I cut it apart, very carefully along the seam lines, traced around each piece, added seam allowances and hem allowances and thus created a pattern from it. Woohoo! Then I tried out my new pattern by sewing this up. It came out pretty close to the original with just very very minor variations. Love it!

Sunday, October 11, 2009

Ottobre 4/09 hoodie, 4/08 pants

Ack, I haven't posted in forever. I have been sewing, sewing, sewing though! Here is one item I'm happy with. It is a reversible hoodie and knit pants for Lily with little VW cars print. The reversible/dual layer top is so warm and cozy without being too heavy or bulky for her, and she loves having a hood. The pants are a cute little boot cut knit pant pattern, just adorable in person. I don't know how long this outfit will last though as it is apparently so comfortably she feels free to get it really dirty, muddy, greasy and grimy, not to mention covered with food stains.

Friday, September 25, 2009

Finished Lily's quilt


IMG_5031
Originally uploaded by WeeBeaks
I started this quilt when I was pregnant with Lily and had just found out we were having a girl. Well, she will be 2 years old in a month or so and I'm finally finishing it up! She loves it though, and so do I. And I'm glad to have it done as I hate to having unfinished projects lying around. Now I have to paint her room with fresh paint to be a nice backdrop for her quilt! LOL

Thursday, September 24, 2009

New Pants!


IMG_5024
Originally uploaded by WeeBeaks

Zach is very hard to fit now that he is 7 years old, pretty average height, but still under 50 pounds with a 20 inch waist! We have been getting those adjustable waist pants with okay results, but each year they get baggier and saggier as he grows up but doesn't grow out much. It is especially hideous looking in dress pants, so these became a necessity to sew. I settled on Simplicity 5732 for my pattern for him and sewed these up. I measured a bit off the first time, and these too are a little large, but much better than typically and a belt makes them definitely wearable. I just picked his size based on hip/waist and lengthened them. I will definitely be sewing this pattern again. It had a lot of nice features seen in menswear, such as the back seam sewn last extending into the waistband for easy alterations, real fly, side seam pockets, pleats, belt carriers, etc. It did have the hidden button plus hook/eye closure in the front, but I modified that to have a hook/eye plus a snap as I thought the button would be a little difficult for him still. And he will have a nicer shirt than that t-shirt when he wears these. :)

Monday, September 14, 2009

PJs for N and nephew


PJs for N and nephew
Originally uploaded by WeeBeaks
Sew Mama Sew blog is having a Pajama Party and I'm joining in. Well honestly I usually sew jammies this time of year anyway. Here are two pair I made Saturday. The pattern is the Ottobre Magazine 4/04 issue, the leggings and the long-sleeve t-shirt. The smaller ones are for my nephew as part of his birthday present, and the larger set is for my son, Noah. The fabric is a nice thermal knit from Joanns with vehicles all over it. This is the beginning of my PJs for the month, but not nearly the end as Noah still needs more, and so does Lily need a couple sets. Luckily I have plenty of fabric ... some would even say too much! LOL

Wednesday, September 9, 2009

Start of Fall Sewing


img_4922
Originally uploaded by WeeBeaks
It is finally cooling off just a tad here, so I started a few fall outfits for Lily. This is the first one, cool enough to wear today but will be worn with cotton tights for fall/winter. The turtleneck is Simplicity 5936. The jumper pattern is a vintage Butterick 3949. I did the applique on the front with various scraps.

Wednesday, September 2, 2009

Finishing a neckline with stretch lace

Finishing a neckline, armhole or waistband with stretch lace can add a nice touch to a top, unders, a cami, etc.


Start with your pattern and sew the neckline, armhole, etc., together so you have it done except the edge finish. If your pattern contains seam allowances on those edges, go ahead and trim off the seam allowance on the edge.

Once the edge no longer has a seam allowance included, take your stretch lace and align the lace over the top of the edge, matching the raw edge of the garment and the outer edge of the lace. Then sew the inner edge of the lace, using a stretchy stitch. I like to use a 3-step zigzag. Use thread to coordinate with your lace color.

IMG_4721


Go all the way around. At the end of your circle, you are back to where you started. I like to fold in the last of the end.

IMG_4729


Here is what it should look like approximately from the back.
img_4723


Now, you need to trim off the excess fabric underneath the lace you sewed on. Trim it very very close to your seam line that attached the lace to the garment.
IMG_4728

At this time you need to go back to where the lace formed the circle and close the circle completely. [Don't do it before this time unless you first fold back the garment fabric or else your garment fabric will be in the seam and can't be trimmed away.] I stitch over the edge of it where it overlaps, again with a 3-step zigzag (just my preference), perpendicular to the original stitching line. Now, the lace is completely joined in a circle.
IMG_4730


All done! Easier than binding for sure. This makes a great neckline, armhole, waistband, etc.

Tank top

Tuesday, September 1, 2009

Outfit for me


Whole outfit
Originally uploaded by WeeBeaks
Today I sewed for me for fall. I did McCall 5434, which has an asymmetrical hem wrap top and pull-on pants. I really like how those came out. The pattern also included a strange tube top for underneath. I skipped that, and instead made a camisole style top from Ottobre Woman magazine, issue 2/07, pattern #1, the tank top. I did lace edges instead of binding on the top for a cami look. We'll see how long a white top lasts with the kids, but for now I'm pleased.

Sunday, August 16, 2009

Simplicity 3802 smock/apron


IMG_4632
Originally uploaded by WeeBeaks
Not the greatest photo, but you see here one of my latest sewing creations, an "apron" as they call it made from Simplicity 3802. I made mine from some Alexander Henry oilcloth, and we are using it as a full coverage bib for our little messy person. I changed the ties in the back called for by the pattern to two little red plastic snaps.

For those of you interested in the complete review of this pattern, I did a review at Patternreview, here. Definitely a keeper of a pattern for us.

Friday, August 14, 2009

Ottobre stretch gingham blouse

This is another entry for the Pattern Stash Contest at Patternreview. This is Ottobre Design Magazine 2/2005 #39, women's blouse. Back then, before Ottobre Woman magazine, the children's issues had 2 or so women's patterns were issue.

I'm really pretty happy with the results of this one. The fabric is a stretch gingham from my fabric stash from years and years ago. This is the first time I have created a front button placket. That went pretty well despite some head scratching on Ottobre's very brief instructions there. LOL I don't think right now I have a single other button front blouse in my closet so I'm happy to own one again! At least until the kids put a nice stain on me. But maybe in a gingham it won't show as much? One can hope.

Thursday, August 13, 2009

Later gator PJ set


Later gator PJ set
Originally uploaded by WeeBeaks
I have been doing a TON of sewing lately, participating in the Pattern Stash Contest at Patternreview.com. Today was a tank top pattern, Ottobre Design Magazine Issue 2/2005, design #19. I matched it up with some Kwik Sew knit shorts for a PJ set for Noah. He liked them so much he wanted to wear them the rest of the day after modeling them for the photo. :)

Monday, July 27, 2009

Lily's new pants


Front view
Originally uploaded by WeeBeaks
I finally finished these I started early last week. These are the "Alma" pants from the Ottobre 4/08 issue, design #6. I skipped the zipper/functional fly and stitched that closed. It called for elastic back, flat front styling, which I wanted to try for her. I think that came out cute. I did buttonhole elastic for the back so they can adjust for her, and did cuffs that I can let down for an extra inch also. I made them to go with the shirt from last fall that still fits. Although trying it on today I'm thinking I better be planning a backup shirt as this one is getting a little bit short in the torso though the sleeves are still perfect. We'll see how long it lasts. The pants are from baby cord, so they are meant for fall. Lily, however, saw her new outfit and started stripping off her current one to try them on. She loves new clothing. She wouldn't let me take them back off her despite the temperature here today, so there she is in long sleeves and cord pants on a HOT day.

Monday, June 29, 2009

Today's sewing really was an adventure

Printable pattern requiring taping a zillion pieces of paper together, slightly too little fabric requiring creative cutting, slippery silky material, broken needles, tension problems, on and on. And the end result was hideous on me. Bah. What a rotten sewing day.

I was working on Kwik Sew 2627, which I got from Print Sew. Currently, it is a free download! That is about the only plus from my perspective. Don't get me wrong; I typically LOVE Kwik Sew patterns. I looked at this and thought it may be a nice easy summer dress. I was a tad concerned it would look like a shapeless sack on me, so I carefully chose view C, with the ties, and did my usual size for the top, grading up slightly for the skirt as I'm a pear shape. I shortened it as even the knee length version was going to be calf length on me.

Well, the size that usually fits great was too wide, way too wide, in the shoulder. I had already test fitted the back pieces, usually my problem, and did an adjustment so that the back neck would not gape. That went great. It was everything else that didn't look good. The fit honestly wasn't terrible at the end except for the neckline, but it just did not suit me at all. So into the trashcan and on with the next project. I think I'm going to do something for Lily or the boys. Their stuff usually fits nicely and looks good on them. Much more satisfying than this.

So, my opinion? The pattern is free right now if you are willing to print it. It runs a tad shapeless so if you are trying to accent a waist, do the tie version at least. For taller people or more of a straight up and down bodytype, it would probably suit you (but then most things probably do!). I'm really not out too much at least with a free pattern and some fabric I have had for years. So all is not lost, but discouraging all the same.

Wednesday, June 24, 2009

New Look 6688


IMG_4418
Originally uploaded by WeeBeaks
I finished up New Look 6688 today for Lily. I'm in love with how it came out. Doesn't she look cute?

I did a full review at Pattern Review, but in brief the changes I made to the pattern were to skip the tulle underskirt and only line the bodice instead of the whole dress. Just the dress alone is over a yard of fabric, and I felt 2 yards of weight on her tiny little self was too much.

I'll definitely be making this dress again though, so cute with the full skirt.

Thursday, June 4, 2009

"Cuddle Monster"

"Cuddle Monster"
Noah was with me at the Joann's last week and was browsing the pattern book when he came across the patterns for stuffed toys. Those of course caught his attention, and he requested one. After much deliberation, he chose a little freebie idea sheet for a fleece monster. He had specific criteria though:
1. NOT Scary
2. No mouth
3. "Happy eyes"
4. Blue
5. With arms and legs "to hug me"

So I modified the pattern at bit and here is what he got. It is far from perfect. I love to sew but crafty little critters are not my forte, not at all. I refused to buy fleece for this thing so he is made from the arm of a repurposed sweater. His arms and legs are felt instead of fleece. Noah loves him no matter how ugly he is.

Monday, June 1, 2009

Ottobre 3/2007 baby dress as a tunic

Front view

Back

Top is baby dress, design #1 of 3/07, worn as a tunic. I used a sz 68 lengthened 1-1/2 inches (she wears a 74-80 typically). I replaced the ribbons with snaps. I only had enough fabric with the roses for the front and one part of the back, so I did the sleeves in pink to tie in the pink half of the back. Then I decided to do the pants to match and it came together. For once I really like my "oops" in fabric shortage and my workaround. LOL

The pants are #3 of 3/2007, "pants with frills" minus the frills and pockets. I did a sz 86 hips and 74 length, but they are still too short in the rise for her with her cloth diapers. That is a common problem for us, which is why I sized up, but I didn't add quite enough. That's okay; it's not visible under her tunic and she seems to think they are comfortable!

Wednesday, May 27, 2009

Simplicity 5874


Simplicity 5874
Originally uploaded by WeeBeaks
Yes, that is my almost-7-year-old in firetruck jammies. Why you ask? Because they were meant for my 3yo, who is much disappointed that his firetruck fabric he loved is now walking around on his brother. This pattern ran HUGE. Noah was sleeping and I eyeballed it for him. The top did look kinda wide and short ... so I did a size 3 and lengthened it 2-1/2 inches. Good thing too or this outfit wouldn't have fit anyone. The top is a little big on Noah but pretty good. The pants, however, also a size 3 pattern, had a good 4 inches of excess length, and my little 3yo is tall for his age, wearing usually size 4. Zach wears a size 6 extra slim and here you see him modeling the size 3 jammies with a little extra length in the top. Buyer beware if you are making this pattern. Yowza, take good flat pattern measurements before you cut. And, learn from me, don't make it while your child is asleep and you can't take some measurements .... unless you have a bigger kid as backup for them if they don't fit!

Wednesday, May 6, 2009

Vogue 8323


img_3884
Originally uploaded by WeeBeaks
Today's project was Vogue 8323. I did view A, the sleeveless one, but added sleeves (obviously from the pic right?). It went together very nicely. I only needed to do a back neck adjustment as apparently I have developed a rounded back or whatever it is called. I have had to adjust the last few patterns for my new fitting problem. Otherwise, I used the petite lines, conveniently marked on the pattern already, and it came out very nice. Now I need to make some pants to coordinate, a much harder think than this knit top.

Tuesday, April 28, 2009

Ms Messy Face


IMG_3833
Originally uploaded by WeeBeaks
So here is our own little Ms Messy Face after dinner with her new romper on. This is Ottobre issue 3/2006 (Summer 2006) #5. It has snaps at the crotch for easy changes and an invisible zipper in the back that I would not have tackled a month ago. Woohoo to me and I'm on a roll with zippers now. haha.

Tuesday, April 21, 2009

Retrofitting a waistband with buttonhole elastic

This is one post that I am migrating from my old blog to my new one as hopefully it will be useful!

ORIGINAL POST:
So, a while back I did Ottobre pants, slim fits, but they were still too large for Zach. I eventually set them aside for a growth spurt. He has had said growth spurt and they fit okay in length and better in hip now ... but still much too large in the waist.


So original pants are here, but larger actually than they appeared, i.e., they fell down when he walked:

Ottobre slim fit pants front

Thanks to the Ottobre English yahoo group, I was given verbal instructions on how to fit them, by inserting buttonhole elastic into the waistband. This would have been a lot easier had I done this in the first place by the way. But, they were already created and he wanted to be able to wear them, so I did the retrofit. Sorry the pictures are crummy but hopefully will be helpful to you all who need to do this for any of your tall skinny kids. :)

It is very very handy if you have an existing pair of pants with buttonhole elastic in them to refer to on placement. This is not essential, but it is helpful. Take the pair you need to modify and look on the inside of the waistband. Choose a spot for the opening for the elastic to go in. A good place for this is usually just past the side seams toward the front so that it would rest approximately between the side seam and the center front. There is going to be a button just past it so try to pick the place you think would be most comfortable on wearing. On the pants in the photo, I have my thumb at approximately that place. You can see the side seam in the photo:

IMG_0937

Now get your seam ripper. Very carefully cut a vertical slit in the only the inner waistband at the site chosen above. Be careful not to cut the outer waistband (the part you see on the outside when the pants are being worn). The slit needs to be ideally the width of your buttonhole elastic.

IMG_0938

In my pants example, the fabric is corduroy. It will fray badly if left just cut. If your pant fabric will not fray, you may be able to insert the elastic now. Most fabrics though you will need to do a handsewn buttonhole. Note you can probably sew the buttonhole first and then cut it open like you would on a machine; however, it is a little easier to cut first in this instance for me so I could be careful not to catch the outer waistband in my sewing. Anyhow, sew the buttonhole by hand. I did the extra step of adding Fray Check on the raw edges to help stop the raveling. I started at one end with tacks across the opening to reinforce the ends, down one side, wide across the buttom and back up the other side. Most anyone will end up with a prettier result than me because I really am bad at handsewing. LOL.

Starting the buttonhole sewing:

Hand sewing the buttonhole

Do the buttonhole on both sides.

Now you need to sew a button on each side just a little ways in front of each hole. Mine are 1 inch from the buttonhole. Choose a button that comfortably goes through the holes in your buttonhole elastic but do not allow it to slip back through.

Button on

All that is left to do now is thread your buttonhole elastic into the casing. Cut a length of elastic the distance from one button to the other along the back waistband. The object is that if it were inside the waistband unstretched there would be no reduction in the waistband; the waistband would be the original length (so if your child grows you are all set!). Feed it through one end into your buttonhole created. I use a bodkin for it but a safety pin works well too. Hook one end on one button, pull it through and hook the other end on the other button. Adjust it by pulling tighter or loosening to fit your child. Put the button through the appropriate hole.

IMG_0942

Enjoy the fact the pants no longer fall down!

IMG_0944

Monday, April 20, 2009

Ottobre 1/2009 #7 tunic/dress

IMG_3815
This is from Ottobre 1/2009 #7 the "kukkopilli" tunic top. I added the large flower applique from scrap fabrics. The design is from 100 Best Full-Size Quilt Blocks & Borders


The flower fabric is from Joanns, a cotton, from a while ago. The mint green is also a cotton, a nicer quality from a quilt shop. These cottons are perfect for a hot summer day, so breezy and light.

For the back closure, I replaced the buttons suggested with plastic resin snaps applied with my KAM press.

She has on bloomers underneath, in a mint green to match, made from a different pattern.

IMG_3817

The great sewing room reorganization

How better to start off a new blog than with pictures of my newly redone sewing/office space? My space is a shared bedroom converted into an office. DH has the other little space off to the left for his desk. I get the majority of the office space.

It had gotten really cluttered and messy. The desk and bookcase were residuals from when it really was an office, when I worked at home. We had slowly migrated it more to a sewing space, keeping the computers and desks in here as well. I really needed more space for my sewing and less space for my desk/computer though now that I wasn't working from home at my desk.

Here are a few "before" pictures. The first one shows the nice window I have, with my sewing space on the right of the picture. The big basket is overflow fabric, mending pile and "to do" list of projects. A big ole mess is what it is.
IMG_3779

Better picture of the sewing desk itself. Underneath are my "scrap" pieces of fabric, which totally are out of control. That huge bin is full of just scrap pieces of woven material. That doesn't even show the knit scrap pieces!
IMG_3778

Overflowing mess of a bookcase full of fabric. The bookcase was totally not suited to storing fabric.
img_3776

And the left side of the desk with junk on the floor, a storage area for more "to do" projects, projects in progress and two wire drawers full of the knit scrap fabric. Believe it or not, the knit scrap was worse last month before I sewed some of it up.
IMG_3775

We decided to get some better storage from IKEA to start with, and it progressed from there. I now have the following "after" room. First up, the sewing area itself. Not much changed there really, except some stuff was moved so it looks nicer. The shelves were there before up high. They hold my patterns in plastic tubs. I also have some elastic and notions stored up there. One cork board holds patterns in progress or that I use a lot, my measurement charts and other sewing things. The one on the right holds general purpose desk items.
IMG_3804

Another view, shows the sewing desk plus you can see how the old storage unit from the left of my desk tucks underneath now. It holds the same stuff, no change there. You can also see the corner of the new white storage unit under the window.
IMG_3803

The biggest change of course was the white storage unit. This is Expedit bookcase on its side under the window. This is sooooo awesome for fabric. The cubes are perfect width and depth for ruler folded fabric. The depth is 15 inches, which is perfect for the longer 60" wide fabric ruler folded. And two stacks fit perfectly side by side. So nice.
IMG_3801

Another view, this time showing the larger Expedit shelving unit to the left of the window. I tucked my sewing books on top of that. And you can see the new large cutting table. The countertop was also IKEA, found in the "as is" section for $15! We put it on two IKEA kitchen carts we already owned that were in the kitchen. It worked out perfectly, very nice height. I stuck my cutting mat on there. The scissors are now held by an IKEA magnetic knife holder. No more hunting for scissors in a bin.
IMG_3800

Last picture shows the cutting area. We reserved the back part of my monitor, keyboard and mouse. The laptop sits below on one of the shelves. We hauled out the old barstool from the garage. This had been a barstool from DH's grandfather, from his garage. It is a little bit too tall but the kids like it. With this setup now Zach can sit and browse with my computer or play a computer game, keeping me company while I cut or sew, and I'm right there to help him. The white shelving on the wall is also IKEA, from before. The magazine files are, yes, you guessed it, IKEA. They hold my Ottobre magazines, my Burda pattern magazines and back issues of Threads magazine and Sew News. I also store my lace, ribbon, trims, embroidery thread and other misc notions in boxes up there. The wicker basket has all my regular elastic, picot elastic and so forth.
IMG_3799

So that is my sewing area. Anyone want to share a link to pics of theirs? :)